Switching blades | Golden Skate

Switching blades

alsilis

Spectator
Joined
Jan 31, 2024
Apologies for the length, felt it was beat to provide all context.
2 months ago I switched from Edea Chorus to Risport RF3, and made the unfortunate mistake of mounting my 8 year old (were not sharpened THAT often so have a bit of life as far as I can tell) Legacy (8") blade to the new boots. Also got them sharpened by someone new.
Made the further mistake of getting a permanent mount just after a very short glide alignment test(few minutes into putting them on for the first time).

Since then my scratch spin has been fully, completely gone. I go from tripping over the toe pick to aggressively falling on my heel. Just trying to wiggle my right foot in place feels horrible - half of the time I feel some part of the heel screeching on the ice.
I thought I might be able to get adjusted, but 2 months in it doesn't seem likely. I was never the best spinner, but even at my worst it wasn't as uncomfortable as now.
3 turns and etc. feel ok-ish, but a bit more awkward.
Backspin, meanwhile, got a bit worse but not as comically horrible as the scratch.

On somewhat of a whim I ordered Coronation Aces, which were tempting me for a while, because I figured if my spins are already gone adjusting to 7" can't make it any worse - but might actually suit me better.

The problem - there are no true skate techs or pro shops, and I'm not sure how to go about mounting the new blades.
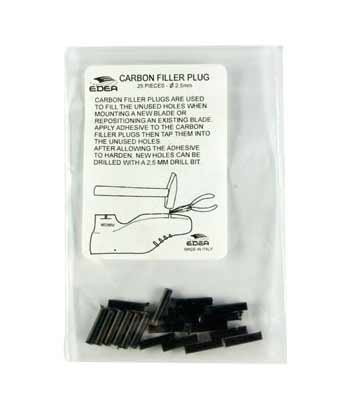
Do the existing holes become unusable as soon as the screw is removed?
Do they absolutely have to be sealed if they are not aligned with new holes made for coronation aces?
Any additional things I need to know if I approach someone who possibly never replaced a blade on a boot that previously had a permanent mount?
Thanks
 

SK4T3

Rinkside
Joined
Apr 16, 2023
Please tell us where you're located. So we can help you out with a figure skate tech nearby.

When I read the first part of your post; my first thought was: "Get a 7" rocker"; but when I'm right; you already bought a brand new pair of JW CA which is a great choice!

Techs/ProShops can plug the Holes with this Original (EDEA) part (I'm sure other brands have same solutions):
carbon-filler.jpg
:

Please give the professional fitter Time to get the blade aligned on your personal needs.
 

alsilis

Spectator
Joined
Jan 31, 2024
Please tell us where you're located. So we can help you out with a figure skate tech nearby.

When I read the first part of your post; my first thought was: "Get a 7" rocker"; but when I'm right; you already bought a brand new pair of JW CA which is a great choice!

Techs/ProShops can plug the Holes with this Original (EDEA) part (I'm sure other brands have same solutions):
carbon-filler.jpg
:

Please give the professional fitter Time to get the blade aligned on your personal needs.
I'm in Israel so really no options as far as techs (...or fitters) go, I'm pretty sure I know of everyone who ever sharpened a blade here, personally know most of them.

Blades were mounted by a coach without much patience.
BTW, the blade is sticking out beyond the sole by like a millimeter, is it possible I'm being thrown off by this?

I'm gonna try to reach out to people and see if they've refilled old holes here and have the equipment, but if not, is it feasible to DIY it? What would I need?
 
Last edited:

tstop4me

Final Flight
Joined
Oct 2, 2015
Country
United-States
Well, since you asked so politely :) ...; here are some highlights so that the OP can decide whether to proceed on their own or not:

* The Risport RF3 is discontinued, but new old stock is still available. The current model is the RF3 Pro. Regardless of the model the OP has, they both have leather soles, so the same procedures apply.

* An old hole can be reused if: (1) the original hole was correctly drilled; (2) the original screw was correctly installed; (3) there is no water damage; (4) the screw is carefully removed when demounting the old blade; and (5) the screw is carefully re-installed when mounting the new blade. That's a lot of ifs to be satisfied. The OP wrote: "Blades were mounted by a coach without much patience.", which likely means that (1) and (2) were not satisfied.

* Even if you won't be installing a new screw in or near an old hole, the old hole should be plugged to prevent water penetration.

* For leather soles, plugs can be cut from hardwood dowel of the appropriate diameter. If you will be installing a new screw in or near the old hole, the plug must be securely bonded with an appropriate adhesive; steel-filled epoxy (regular hardening, not fast hardening) works well. If the hole has no rot, you can plug it as is. If the hole has rot, you need to drill out the hole to a larger diameter to remove the rot before you plug it. If you will not be installing a screw in or near the old hole, many techs will simply pound the plug into the hole with a hammer. But I believe it's a safer practice always to use adhesive (and less confusing should you choose to remount a blade in the future; no guessing as to which plug has been bonded and which plug has been pounded).

* Make the plugs long enough so they stick out from the sole and heel. After the adhesive has fully hardened, trim the plugs with a fine saw and file the plugs until they're flush with the sole and heel.

* Once the soles and heels have been plugged, you are ready to mount the new blades. You will need an electric drill; an appropriate drill bit (depends on the screws you're using); an appropriate screwdriver (depends on the screws you're using) [use a manual screwdriver, not a power one]; a center punch; and a straight edge at least as long as the blade (to check that you don't bend the blade via improper alignment).

* I'll stop here for now. In summary, the tools and skills you need are the basic ones used in woodworking. Do you or a friend have them? Even so, since your boots are not cheap, I suggest you first practice on an old pair with leather soles. I can follow up with more details if you choose to proceed. According to forum rules, I can't post links to specific supplies. But if you want them, send me a PM. You will probably need to get appropriate substitutes in Israel though; I'm in the US.
 
Last edited:

alsilis

Spectator
Joined
Jan 31, 2024
Well, since you asked so politely :) ...; here are some highlights so that the OP can decide whether to proceed on their own or not:

* The Risport RF3 is discontinued, but new old stock is still available. The current model is the RF3 Pro. Regardless of the model the OP has, they both have leather soles, so the same procedures apply.

* An old hole can be reused if: (1) the original hole was correctly drilled; (2) the original screw was correctly installed; (3) there is no water damage; (4) the screw is carefully removed when demounting the old blade; and (5) the screw is carefully re-installed when mounting the new blade. That's a lot of ifs to be satisfied. The OP wrote: "Blades were mounted by a coach without much patience.", which likely means that (1) and (2) were not satisfied.

* Even if you won't be installing a new screw in or near an old hole, the old hole should be plugged to prevent water penetration.

* For leather soles, plugs can be cut from hardwood dowel of the appropriate diameter. If you will be installing a new screw in or near the old hole, the plug must be securely bonded with an appropriate adhesive; steel-filled epoxy (regular hardening, not fast hardening) works well. If the hole has no rot, you can plug it as is. If the hole has rot, you need to drill out the hole to a larger diameter to remove the rot before you plug it. If you will not be installing a screw in or near the old hole, many techs will simply pound the plug into the hole with a hammer. But I believe it's a safer practice always to use adhesive (and less confusing should you choose to remount a blade in the future; no guessing as to which plug has been bonded and which plug has been pounded).

* Make the plugs long enough so they stick out from the sole and heel. After the adhesive has fully hardened, trim the plugs with a fine saw and file the plugs until they're flush with the sole and heel.

* Once the soles and heels have been plugged, you are ready to mount the new blades. You will need an electric drill; an appropriate drill bit (depends on the screws you're using); an appropriate screwdriver (depends on the screws you're using) [use a manual screwdriver, not a power one]; a center punch; and a straight edge at least as long as the blade (to check that you don't bend the blade via improper alignment).

* I'll stop here for now. In summary, the tools and skills you need are the basic ones used in woodworking. Do you or a friend have them? Even so, since your boots are not cheap, I suggest you first practice on an old pair with leather soles. I can follow up with more details if you choose to proceed. According to forum rules, I can't post links to specific supplies. But if you want them, send me a PM. You will probably need to get appropriate substitutes in Israel though; I'm in the US.
Thank you so much for taking the time for this detailed answer! I have decided to go for it and deal with everything myself.
Might as well learn sooner rather than later. I should have access to a woodworking workshop soon, and I will update with results once the old holes are sealed.
If I may ask a follow up question about the blade mounting:
IMGUR link

This is how it looks currently with the old blades.
Am I correct in assuming the right blade especially needs to be mounted further back and not stick out beyond the sole?
 

tstop4me

Final Flight
Joined
Oct 2, 2015
Country
United-States
When you install the new temp mount, initially have the tip of the sole plate of the blade nominally in line with the tip of the sole of the boot. But you can later move the blade forward or backward a bit to adjust how the sweet spot aligns with your foot.

Both of your blades are set far to the inside. That's usually done for someone who strongly pronates. Did your coach know you pronate strongly and do this intentionally?

From the photos, it appears that the right blade is set further in than the left blade. Is that true? (Sometimes photos are misleading.) If so, then the right blade might have been intentionally moved forward a bit so that the side of the heel plate of the blade doesn't stick out past the side of the heel of the boot. Some people do have it stick out, but personally I think it's hazardous to fall and have a mounting plate dig into the ice.
 
Last edited:

alsilis

Spectator
Joined
Jan 31, 2024
When you install the new temp mount, initially have the tip of the sole plate of the blade nominally in line with the tip of the sole of the boot. But you can later move the blade forward or backward a bit to adjust how the sweet spot aligns with your foot.

Both of your blades are set far to the inside. That's usually done for someone who strongly pronates. Did your coach know you pronate strongly and do this intentionally?

From the photos, it appears that the right blade is set further in than the left blade. Is that true? (Sometimes photos are misleading.) If so, then the right blade might have been intentionally moved forward a bit so that the side of the heel plate of the blade doesn't stick out past the side of the heel of the boot. Some people do have it stick out, but personally I think it's hazardous to fall and have a mounting plate dig into the ice.
The temp mount allows for a bit of forward/backward movement? That's a surprise for me.

My knees do pronate quite severly, but I'm not sure if it was done intentionally. After first install one leg was leaning on the outside edge and the other on the inside one.
The right blade is way further in, I think the right blade was actually over-corrected a bit - there is the tiniest bit of pull to the outside. I feel it could be moved to the outside a bit and still be ok.
Especially since on the choruses the blade was installed not as far in.
When installing the new blades I'll see if I can manage with the right blade further back without the heel plate sticking out.
Thanks!
 

tstop4me

Final Flight
Joined
Oct 2, 2015
Country
United-States
The temp mount allows for a bit of forward/backward movement? That's a surprise for me.
Sorry, what I wrote wasn't clear. The slots on the temp mount allow for limited inside/outside adjustment, but not forward/backward. What I meant was, be sure to test out the forward/backward feel also when you have a temp mount. That way, if you do need to adjust the forward/backward position, you only need to plug the 4 temp holes and re-drill 4 new holes. Similarly, if you need more inside/outside adjustment than the limited adjustment that the slots allow. As you've found out the hard way, if you don't take your time evaluating the temp mount, and rush to a permanent mount, you have a lot more holes to deal with.
 
Top